Add an AWS secrets manager
You can integrate AWS Secrets Manager to securely manage your Harness secrets.
Unlike AWS KMS, AWS Secrets Manager stores both secrets and their encrypted keys. In contrast, AWS KMS requires Harness to store the secret in its own store while retrieving the encryption keys from KMS. For more details on using AWS KMS as a Secrets Manager, refer to Add an AWS KMS Secrets Manager.
This guide explains the steps to add an AWS Secrets Manager in Harness."
You can only use Harness Built-in Secret Manager to store authentication credentials for access to the corresponding secret manager.
Storing credentials from one secret manager within another can result in complex and challenging situations. Moreover, these configurations might introduce vulnerabilities, posing potential security risks.
The Harness platform has several validations, including the disabling of self-references.
- If you're adding an AWS Secrets Manager on ROSA, set the environment variable
AWS_REGIONto the appropriate region, such asAWS_REGION=us-east-1.
Permissions: Test AWS Permissions
Harness uses the same minimum IAM policies for AWS secret manager access as the AWS CLI.
The AWS account you use for the AWS Secret Manager must have the following policies at a minimum:
{
    "Version": "2012-10-17",
    "Statement": {
        "Effect": "Allow",
        "Action": [
            "secretsmanager:Describe*",
            "secretsmanager:Get*",
            "secretsmanager:List*"
        ],
        "Resource": "*"
    }
}
These policies let you list secrets which will allow you to add the secret manager and refer to secrets, but it will not let you read secrets values.
The following policy list enables Harness to perform all the secrets operations you might need:
{
    "Version": "2012-10-17",
    "Statement": {
        "Effect": "Allow",
        "Action": [
          "secretsmanager:CreateSecret",
          "secretsmanager:DescribeSecret",
          "secretsmanager:DeleteSecret",
          "secretsmanager:GetRandomPassword",
          "secretsmanager:GetSecretValue",
          "secretsmanager:ListSecretVersionIds",
          "secretsmanager:ListSecrets",
          "secretsmanager:UpdateSecret",
          "secretsmanager:TagResource"
        ],
        "Resource": "*"
    }
}
Refer to the AWS documentation on Using Identity-based Policies (IAM Policies) for Secret Manager.
To test, use your AWS account and run the command aws secretsmanager list-secrets on the Harness Delegate host or any other host.
Step 1: Add a Secret Manager
This topic assumes you have a Harness Project set up. If not, refer to Create Organizations and Projects.
You can add a connector from any module in your Project in Project SETUP, or in your Organization, or Account Resources.
- Select one of the following settings: Project, Organization, or Account.
- Navigate to (Account/Organization/Project)-level Resources.
- Click on Connectors.
- Click on New Connectors.
- Scroll down and check for Secret Manager.
- Select AWS Secrets Manager.
Below is an example for adding to the Account.
For information on restrictions on names and maximum quotas, go to Quotas for AWS Secrets Manager.
Step 2: Overview
- Enter a Name for your secret manager.
- You can either update the ID or keep it the same as your secret manager's name. For more information, visit Entity Identifier Reference.
- Provide a Description for your secret manager.
- Enter Tags for your secret manager.
- Select Continue.
Step 3: Credential Details
When setting up your AWS Secrets Manager in Harness, you can choose one of the following Credential Types for authentication:
- AWS Access Key
- Assume IAM Role on Delegate
- Assume Role Using STS on Delegate
- OIDC
General Settings for All Credential Types
-
Use "put-secret-value" Action to update secret value:
-
By default, Harness uses the
UpdateSecretaction to update secret values, which requires thesecretsmanager:UpdateSecretpermission for AWS Secrets Manager. Enable this option to use thePutSecretValueaction instead, requiring thesecretsmanager:PutSecretValuepermission.
noteThis item requires Harness Delegate version 24.11.84500. For more details about the Harness Delegate feature, please refer to the release notes.
-
-
Use as Default Secrets Manager:
- Enable this option to set this Secrets Manager the default for all secret operations within your Harness account.
-
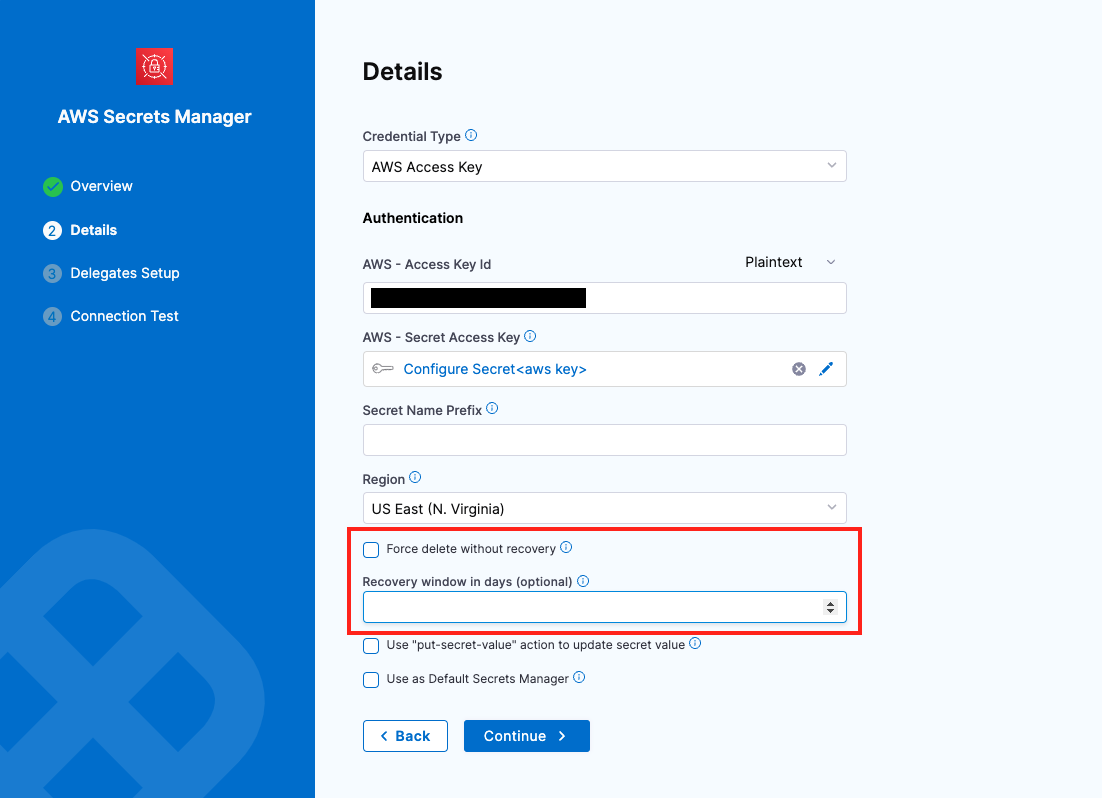
Force delete without recovery:
-
Force Delete Without Recovery: Enabling this option ensures that when a secret in AWS Secrets Manager is deleted, it will be permanently removed without any recovery window. The secret is deleted immediately, and recovery is not possible.
-
Recovery Window in Days (Optional): When specified, a delete request is made to AWS with the provided recovery window. Although the secret is deleted in Harness, it can be recovered in AWS Secrets Manager within the specified window. The recovery window can range from 7 to 30 days, with 30 days being the default if not specified.
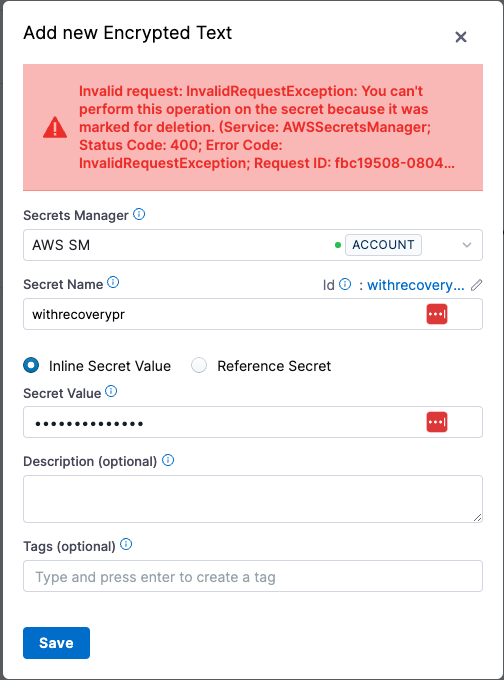
 Important Note
Force Delete without Recovery
- If a user attempts to create the same secret (as an inline secret) again in Harness, an exception will be thrown.
- Additionally, Force Delete Without Recovery cannot be enabled when a recovery window value is provided.
-
Credential Types
1. AWS Access Key
Use your AWS IAM user login credentials for authentication.

Prerequisites
- Access Key ID and Secret Access Key: Obtain these from the JSON Key Policy or the AWS IAM console under Encryption Keys.
- For detailed instructions, see Finding the Key ID and ARN in the AWS documentation.
Providing AWS Access Key ID
You have two options for adding the Access Key ID:
-
Plaintext:
- Enter the Access Key ID directly into the AWS Access Key ID field.
-
Encrypted:
- Click Create or Select a Secret.
- In the dialog, create or select a Secret and enter the Access Key ID as the secret value.
- Save and use the created secret for this configuration.
Providing AWS Secret Access Key
- Click Create or Select a Secret.
- Create or select an existing Secret with the Secret Access Key as its value.
Additional Fields
- Secret Name Prefix: Add a prefix to all secrets stored under this Secrets Manager. For example, using
devopsas the prefix results in secrets likedevops/mysecret. This is not a folder name. - Region: Select the appropriate AWS region for your Secrets Manager.
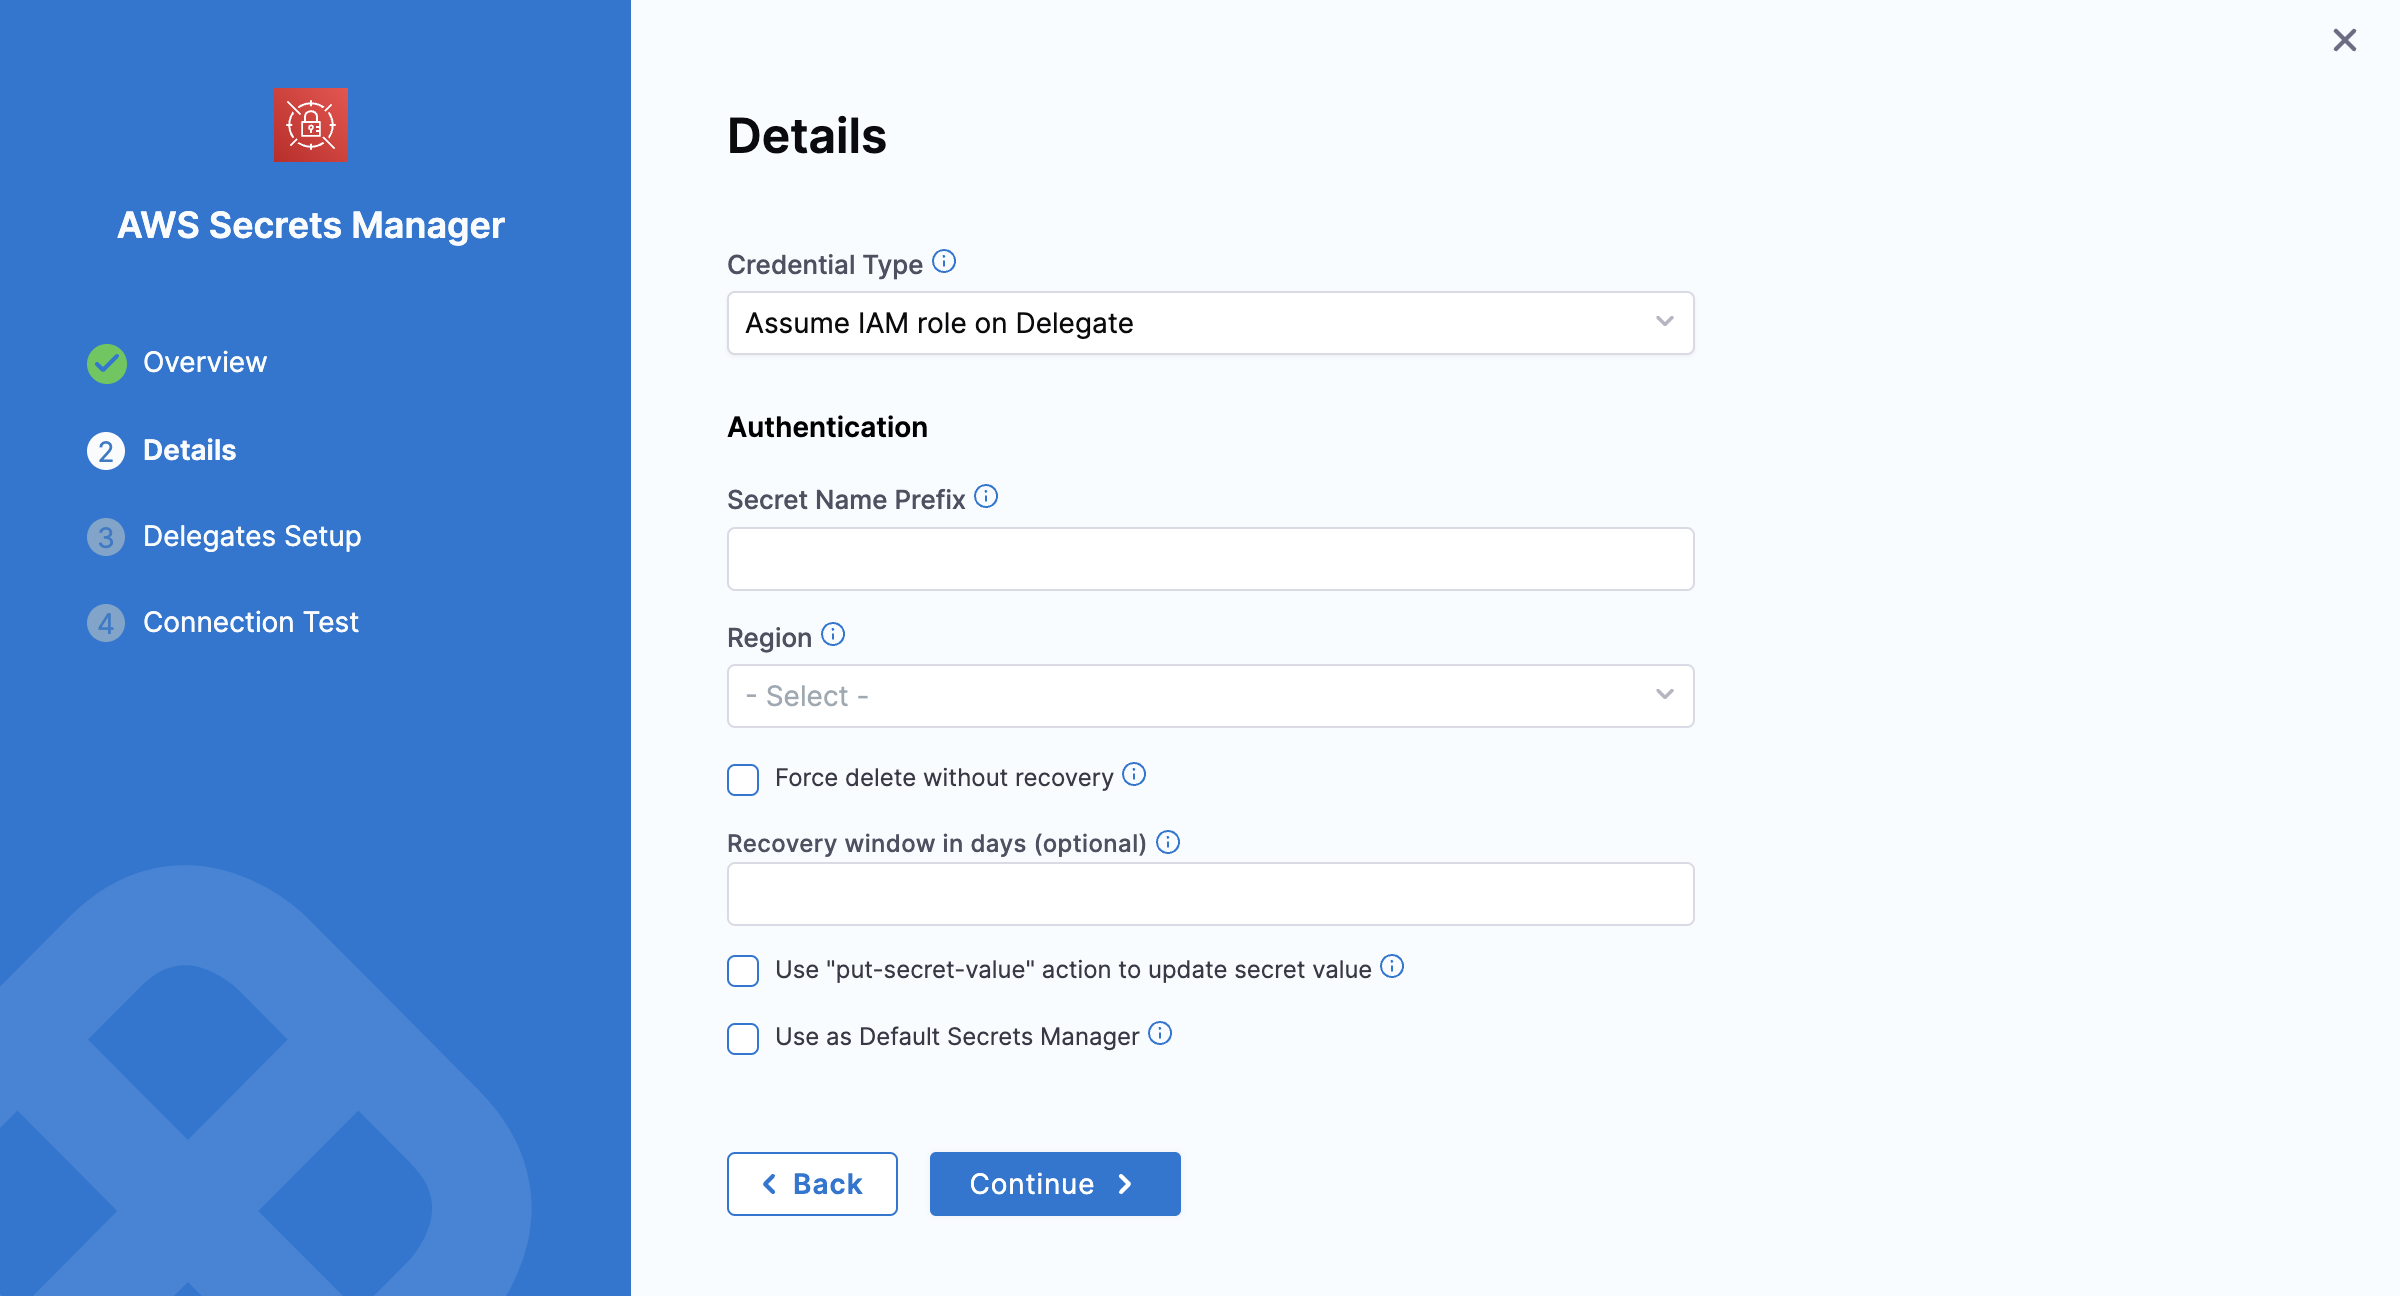
2. Assume IAM Role on Delegate
With this option, Harness uses the IAM role assigned to the AWS host running the selected Delegate for authentication.
Prerequisites
- Ensure the Delegate host has the appropriate IAM role assigned.
Additional Fields
- Refer to the Secret Name Prefix and Region settings described under the AWS Access Key section above.
3. Assume Role Using STS on Delegate
Harness uses AWS Security Token Service (STS) to assume a role. This option is commonly used for cross-account access or assuming roles within the same AWS account.

Prerequisites
- Configure an IAM role in the target AWS account.
Required Fields
- Role ARN: Enter the Amazon Resource Name (ARN) of the role you want to assume.
- External ID: If provided by the account administrator, enter the External ID for additional security. See AWS External ID documentation for more details.
- Assume Role Duration: Specify the session duration for the assumed role. For more information, refer to the AssumeRole API documentation.
Additional Fields
- Refer to the Secret Name Prefix and Region settings described under the AWS Access Key section above.
4. OIDC - OpenID Connect
Harness uses OpenID Connect (OIDC) to authenticate and authorize users. This option is commonly used for secure identity federation across different applications or cloud platforms, enabling seamless authentication and access management.
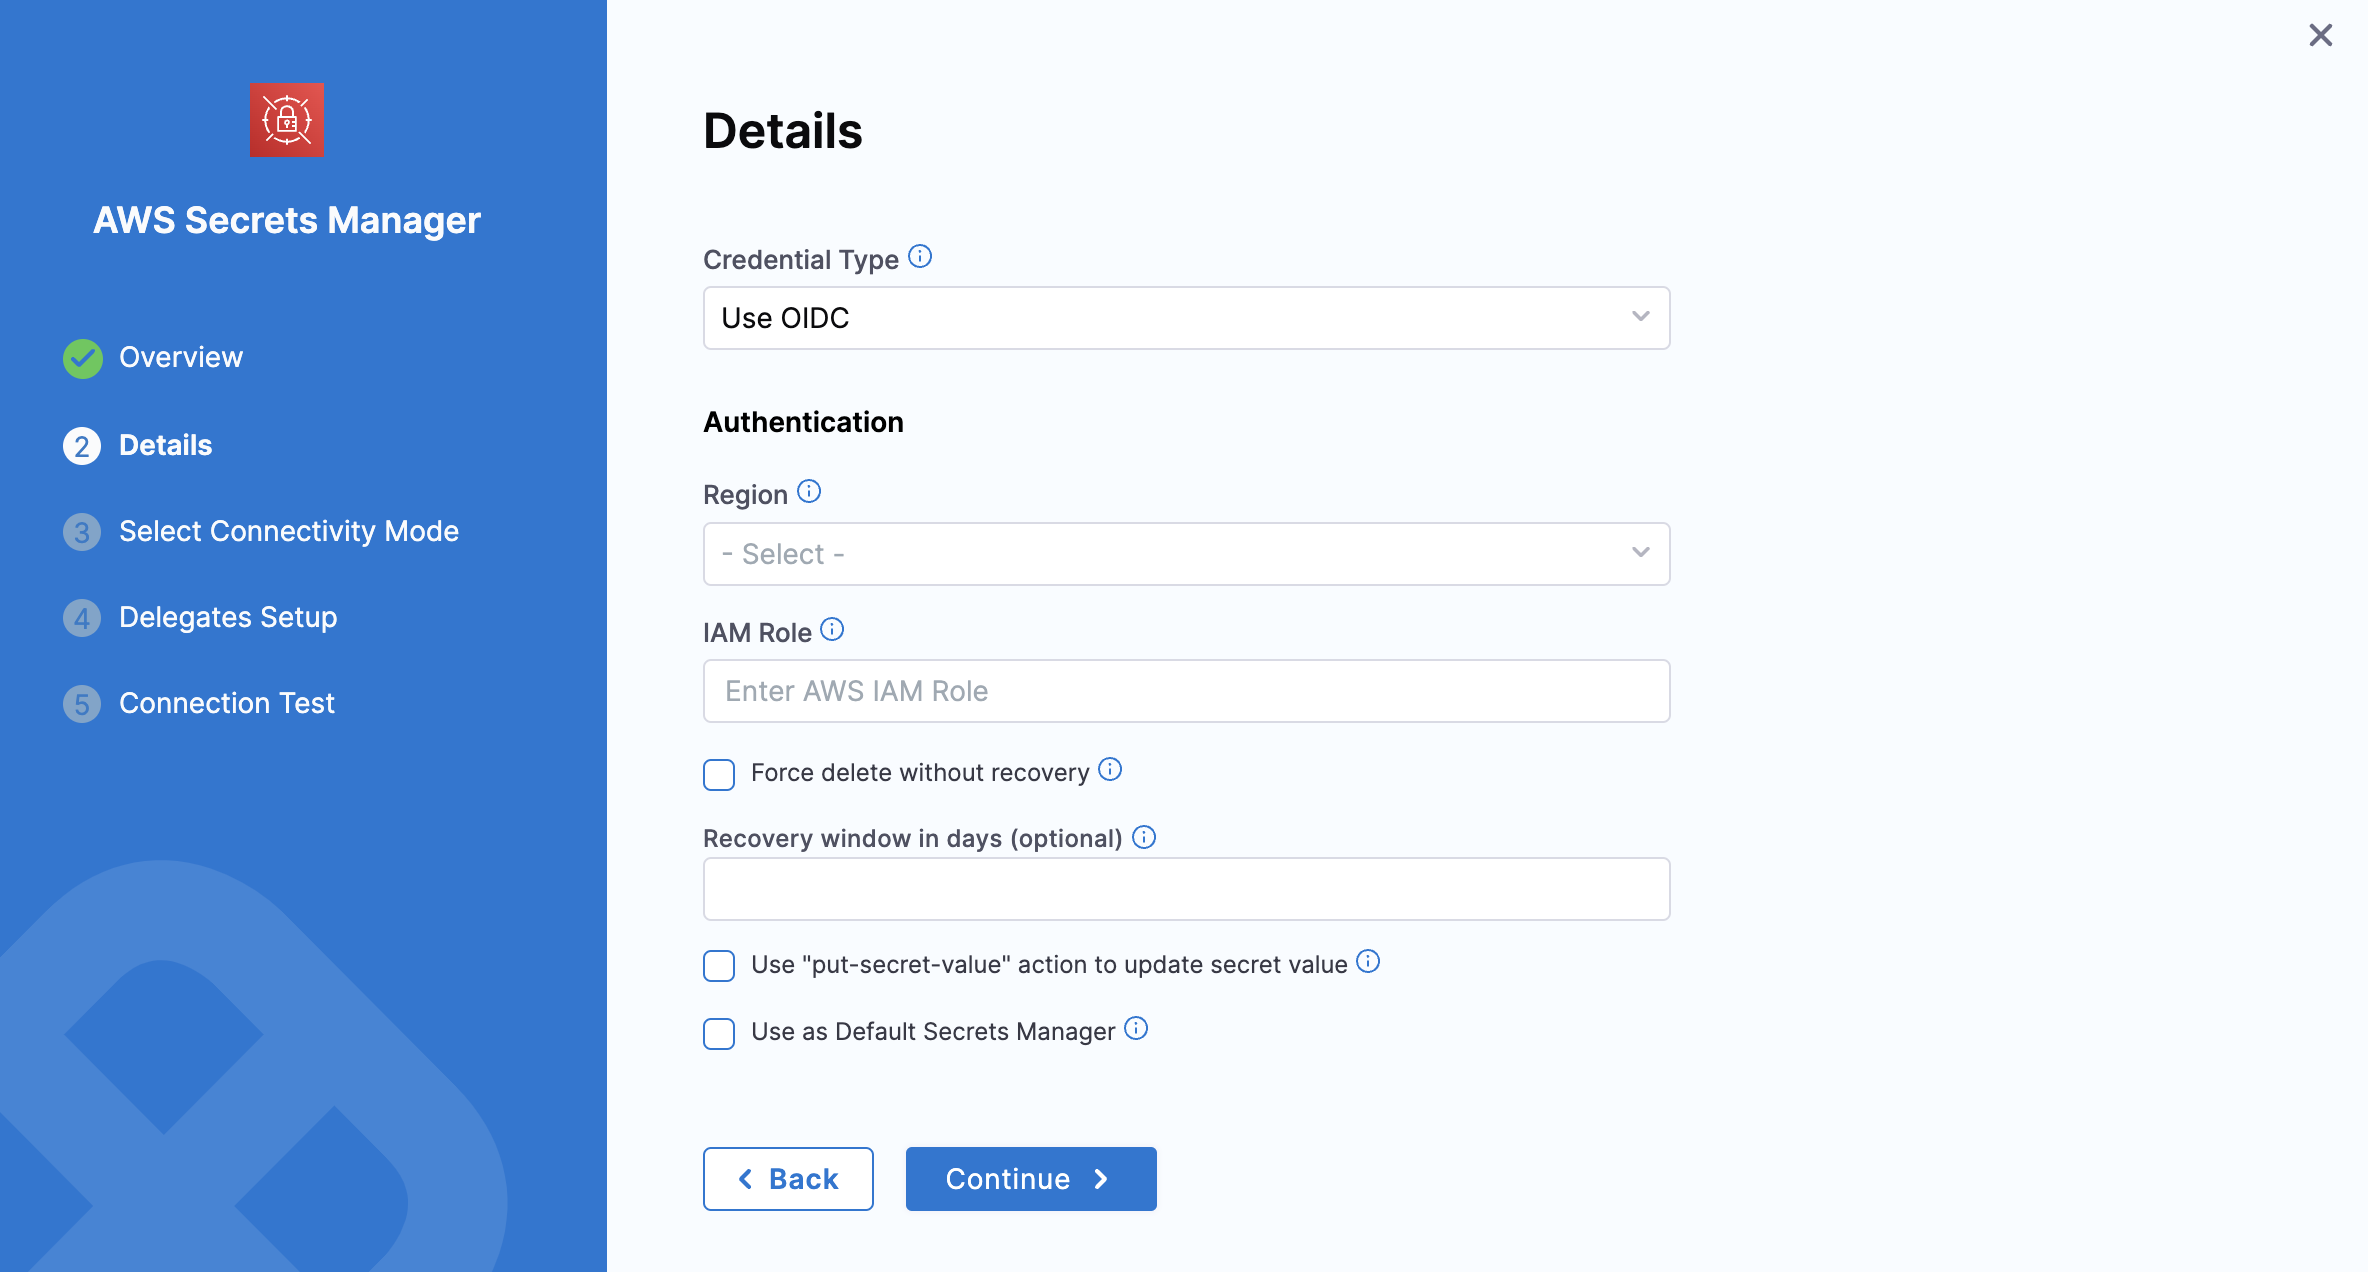
-
Configure an IAM role in the target AWS account.
-
Once your configuration is complete, set the IAM role and region below to proceed with the setup, as shown in the image above.
An additional step before proceeding.
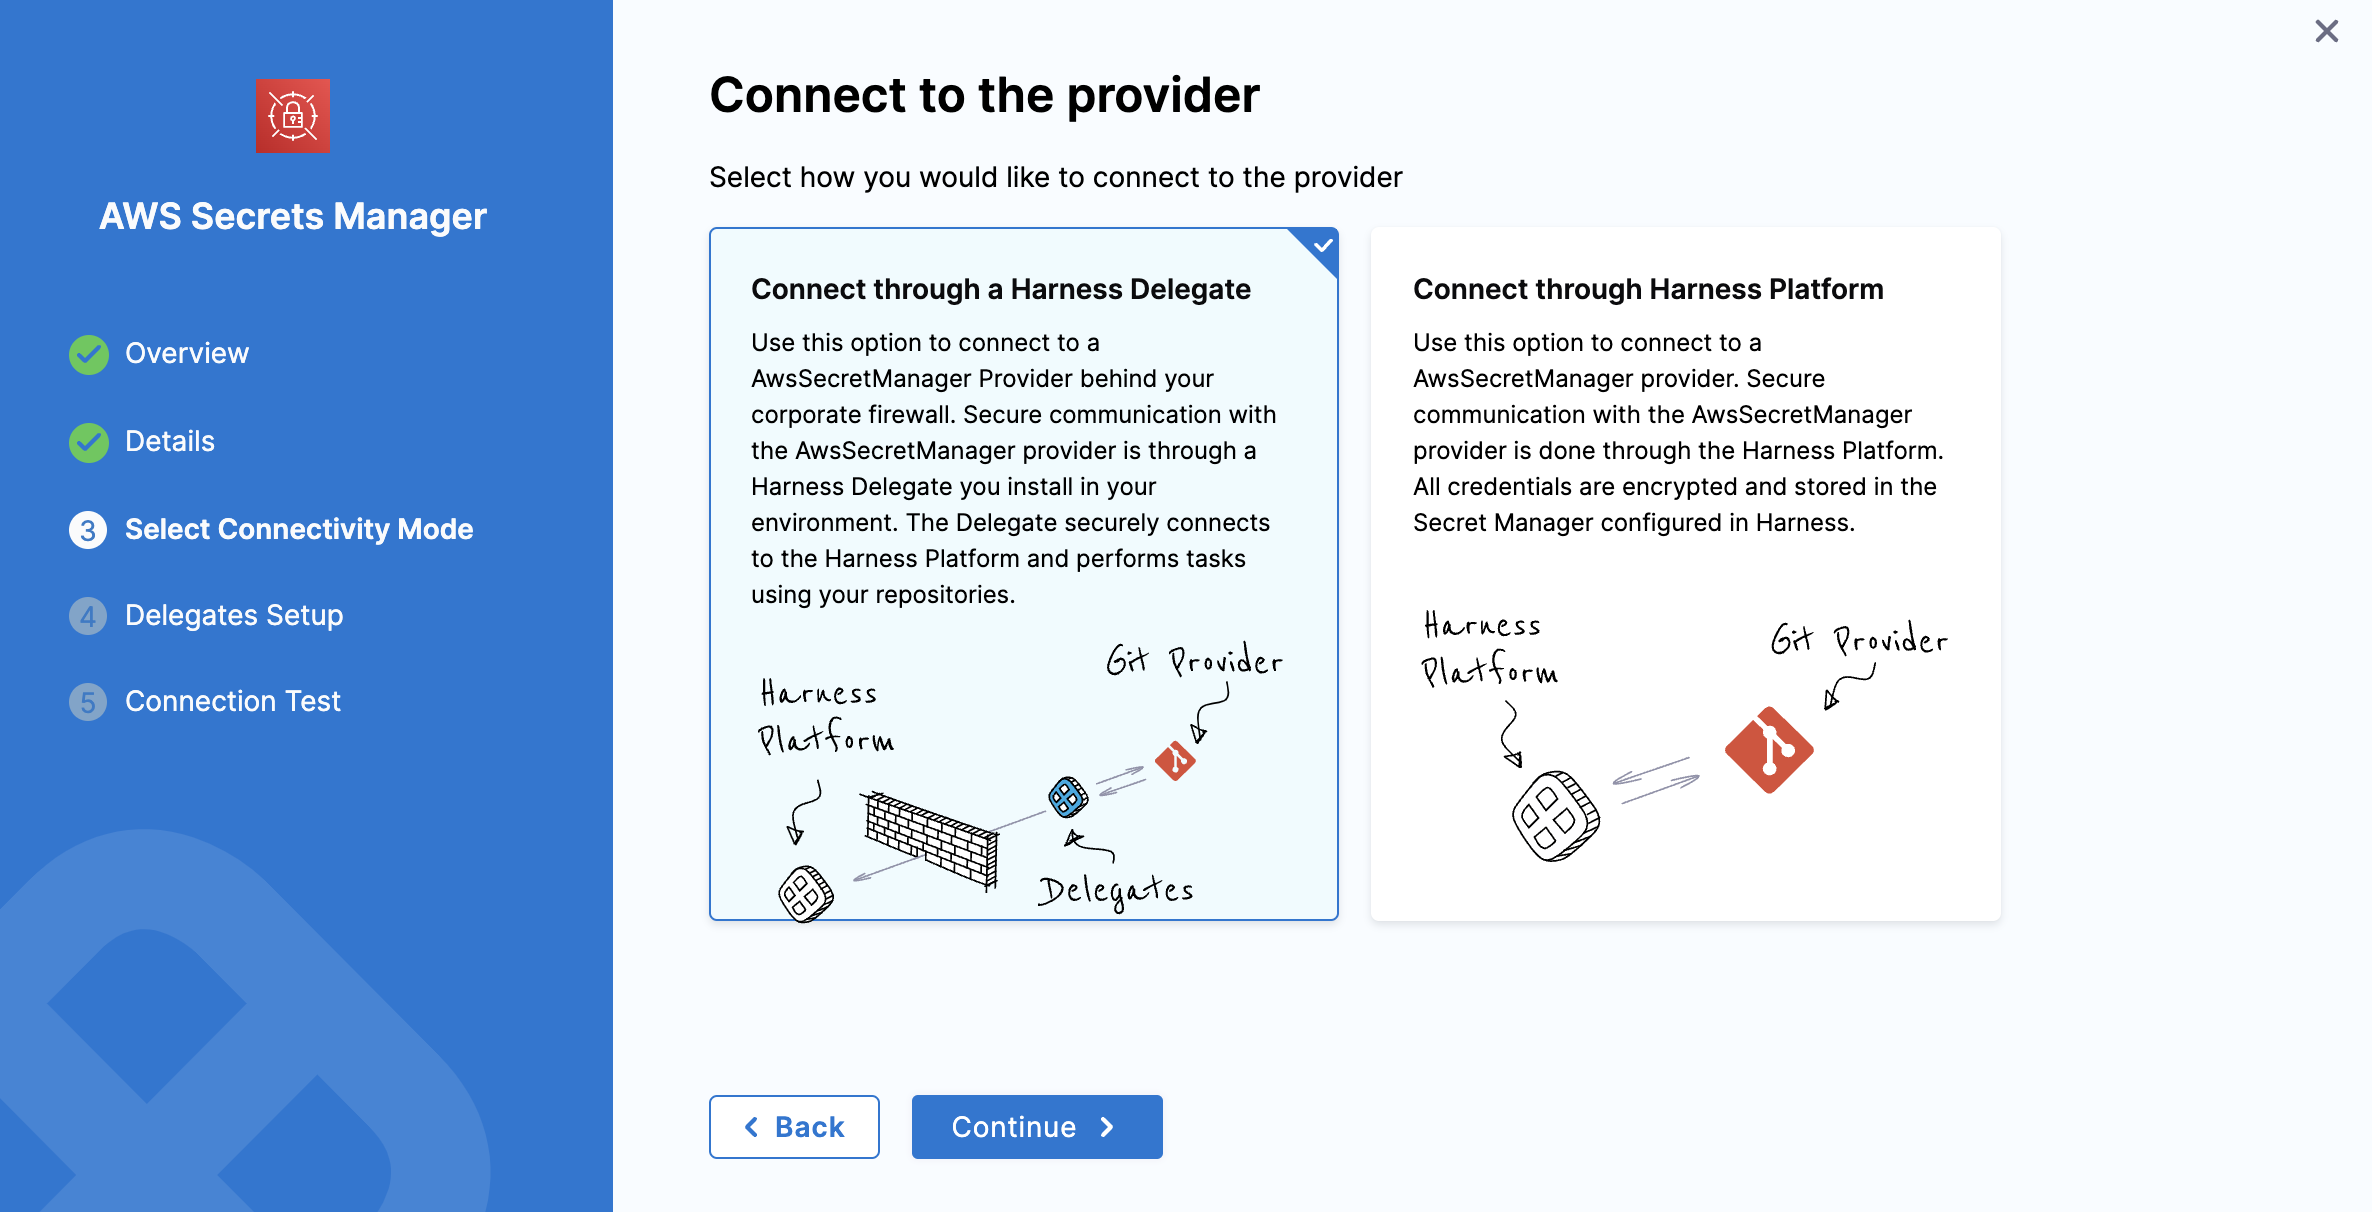
Connectivity mode
This additional step allows you to select the connectivity mode.
Once you have selected OIDC, you will be able to select connectivity mode, based on the requirement you can select the provider that can be either connect through a delegate or through Harness platform.
Step 4: Setup Delegates
In Setup Delegates, enter Selectors for specific Delegates that you want to allow to connect to this connector.
Step 5: Test Connection
Once the Test Connection succeeds, select Finish. You can now see the connector in Connectors.
Reference an AWS Secrets Manager Secret
In order to reference your AWS Secrets Manager secret, customers have a few options to retrieve the secret
They can either retrieve the secret directly through a Referenced JSON secret, or they can utilize a "referenced secret" type. The benefit to utlizing a referenced secret is that it allows for some more complicated conditions to be utilized, and customers can update the referenced secret at one location, instead at every reference point.
Reference JSON secrets
Harness allows you to manage the lifecycle of your secrets independently by referencing JSON secrets in the vault.
For example, you can store a secret in vault with the following JSON.
{
  "key1": "value1",
  "key2": {
    "key21": "value21",
    "key22": "value22"
  },
  "key3": {
    "key31": {
      "key311": "value311"
    }
  }
}
Here are sample outputs for the respective JSONPath from the above JSON file:
test-secret (without any # key)
{
  "key1": "value1",
  "key2": {
    "key21": "value21",
    "key22": "value22"
  },
  "key3": {
    "key31": {
      "key311": "value311"
    }
  }
}
test-secret#key1
"value1"
test-secret#key2
{
  "key21": "value21",
  "key22": "value22"
}
test-secret#key3
{
  "key31": {
    "key311": "value311"
 }
}
test-secret#key3.key31
{
  "key311": "value311"
}
test-secret#key3.key31.key311
"value311"
You cannot use a JSON XPath for nested keys in expressions. For example, <+secrets.getValue("account.YOUR_SECRET_MANAGER://myVault/harness/testpath/example")>.
Harness provides limited support for keys that include dots. Keys with dots only work when the key is present at first level in the JSON. For example:
{
  "key.abc": "some-value",
  "key": {
    "nested.key1": "some-value"
  },
  "key.pqr": {
    "nestedKey": "some-value"
  },
  "pqr.xyz": "some-value",
  "pqr": {
    "xyz": "some-nested-value"
  }
}
Here are sample outputs for the respective JSONPath from the above JSON file:
/path/to/secret#key.abcreturnssome-value./path/to/secret#key.pqrreturns{"nestedKey": "some-value"}./path/to/secret#key.nested.key1andkey.pqr.nestedKeyare not supported./path/to/secret#pqr.xyzreturnssome-nested-valueand notsome-value. (Hierarchical paths take precedence over keys with dots.)
Harness does not recommend using keys that include dots and might deprecate support in future releases.
Referenced AWS Secrets Manager Secret
Customers can create a referenced secret and establish a link to the secret within AWS and test that reference. The following are instructions about how to establish the connection, and how to refer to the secret.
If the key or secret reference need to updated in the future, this also provides a centralized location to make the change.
Cross Account AWS Secrets Manager Secrets
Customers looking to reference Cross Account Secrets will need to use Harness Secrets References to pull the secret from the correct account.
This is because by default, any connector to an AWS secrets manager will utilize the role in the delegate, but the secret reference will default to the account that the role resides in. In Cross Account references, the user needs to be able to definie the account to access.
Example
The Cross Account Role resides in AWSAccountEast, and the team has set up an AWS Secrets Manager Connector. The team then needs to reference a key in AWSAccountWest.
If teams attempt to call a secret directly using the expression for JSON Reference, <+secrets.getValue("account.YOUR_SECRET_MANAGER://myVault/harness/testpath/example")>, this will fail as there is no method to specify the account. It will end up looking for the secret in AWSAccountEast instead of AWSAccountWest.
To reference that secret, Harness users should utilize secret references to get keys that reside in a cross-account, and not a direct reference.
- Go to your Secrets, under your Harness Settings (Account/Org/Project level settings, depending on where the secret and AWS Secrets Manager Connector Reside)
- Create a new
secret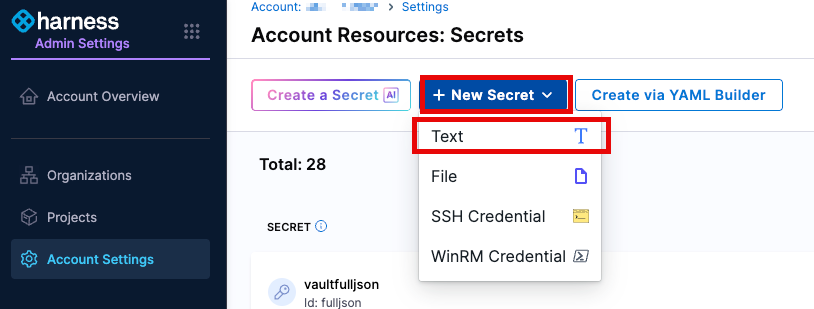
- Change the secrets manager to the
AWS Managerthat has been created already. (This should be residing inAWSAccountEastin our example) and click `Apply Selected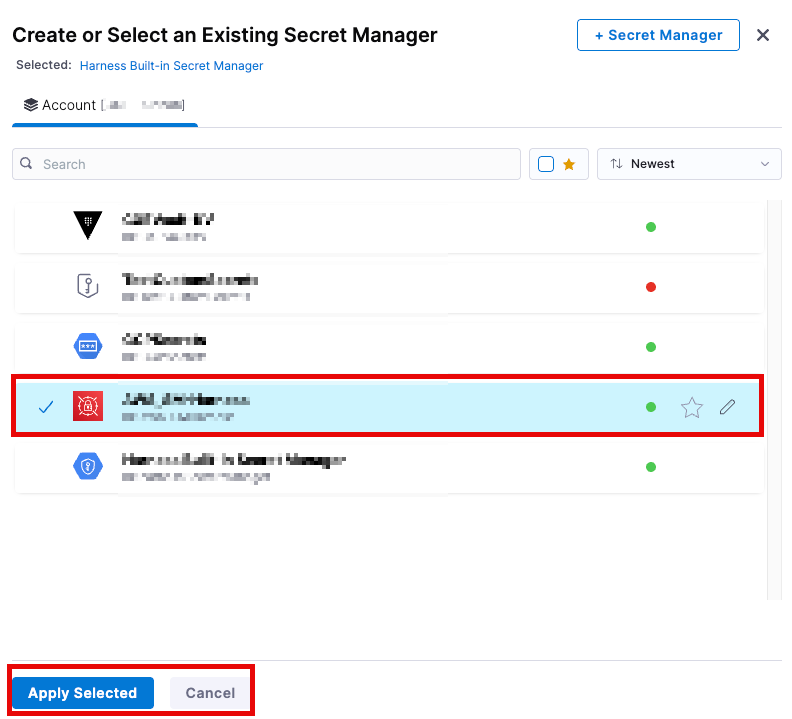
- Fill in all additional details such as the
Secrets Name,ID,TagsandDescription. - Change the radiobutton to the
Referenced Secretchoice.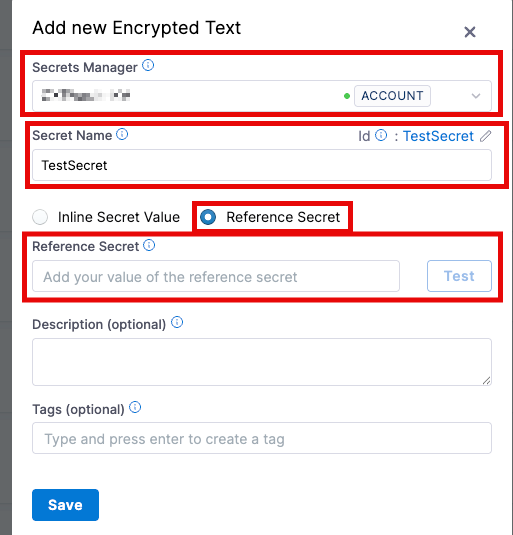
- In the field for the Reference Secret, enter the ARN and key that the team is accessing. The format should mimic
arn:aws:secretsmanager:REGION:ACCOUNT_ID:harness/testsecret#secrekey, where the Region and Account matchAWSAccountWestin our example. This now allows you to refer to the account you want to access the secret from, while still using the role in the correct base account. - Refer to the secret by its location and ID
<+secrets.getValue("account.secretname")>